In this blog, we will build a wizard where user can navigate between the components before actually submitting the record.
Requirement: Create Account, Contact and Review Screen where the user can switch between screens using ‘back’ and ‘next’ buttons on the wizard.
Solution:
You can view this in action here:
In Winter 17, Salesforce is providing the “force:navigateToComponent” event which enables us to navigate to another component within Salesforce1 and Lightning experience but this event is currently in a beta version which its own limitation.
There are multiple ways of implementing the wizard, we will see one of them by using “$A.CreateComponent” method and by attributes.
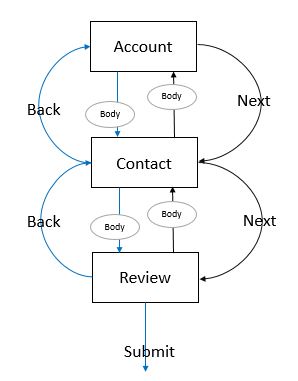
Below is the high level diagram – how the communication/flow is happening between the components.

Here if we see, we are having independent components for Account, Contact and Review. And when next button (highlighted as black arrow) is clicked it will dynamically create component and the same goes for back button (highlighted as Blue arrow) and displayed in the body div tag of the component.
We will create independent components for Account, Contact and for the Review screen.
Step 1: Creating New Account component (CreateNewAccount.cmp):
<aura:component >
<aura:attribute name="accRec" type="Account" default="{'sobjectType' : 'Account'}" />
<aura:attribute name="conRec" type="Contact" default="{'sobjectType' : 'Contact'}" />
<div aura:id="body">

<b>Account:</b>
<div class="slds-form-stacked">
<div class="slds-form-element">
<ui:inputText label="Name" value="{!v.accRec.Name}" required="true"  class="slds-input"/>
<ui:inputCheckbox label="Active" value="{!v.accRec.Active__c}" />
<ui:inputURL label="Website" value="{!v.accRec.Website}" /></div>
	<lightning:button variant="brand" label="Next" onclick="{!c.nextToContact}" /></div>
</div>
</aura:component>
Step 2: CreateNewContact Contoller:
nextToContact : function(component, event, helper) {
$A.createComponent(
"singhforce:CreateNewContact",
{
"accRec":component.get("v.accRec"),
"conRec":component.get("v.conRec")
},
function(newComp) {
var content = component.find("body");
content.set("v.body", newComp);
}
);
}
Step 3: Creating New Contact component (CreateNewContact.cmp):
<aura:component >
<aura:attribute name="accRec" type="Account" default="{'sobjectType' : 'Account'}" />
<aura:attribute name="conRec" type="Contact" default="{'sobjectType' : 'Contact'}" />
<div aura:id="body">

<b>Contact:</b>
<div class="slds-form-stacked">
<div class="slds-form-element">
<ui:inputText label="Last Name" value="{!v.conRec.LastName}" required="true"  class="slds-input"/>
<ui:inputEmail label="Email" value="{!v.conRec.Email}" />
<ui:inputPhone label="Phone" value="{!v.conRec.Phone}" /></div>
	<lightning:button variant="neutral" label="Back" onclick="{!c.backToAccount}" />
			<lightning:button variant="brand" label="Next" onclick="{!c.nextToReview}" /></div>
</div>
</aura:component>
Step 4: CreateNewContact Controller:
backToAccount : function(component, event, helper) {
helper.navigateToComponent(component, "singhforce:CreateNewAccount");
},
nextToReview : function(component, event, helper) {
helper.navigateToComponent(component, "singhforce:AccountContactReviewScreen");
}
Step 5: CreateNewContact Helper:
navigateToComponent : function(component, cmpName) {
$A.createComponent(
cmpName,
{
"accRec":component.get("v.accRec"),
"conRec":component.get("v.conRec")
},
function(newComp) {
var content = component.find("body");
content.set("v.body", newComp);
}
);
}
Step 6: AccountContactReviewScreen.cmp
<aura:component >
<aura:attribute name="accRec" type="Account" default="{'sobjectType' : 'Account'}" />
<aura:attribute name="conRec" type="Contact" default="{'sobjectType' : 'Contact'}" />
<div aura:id="body">
<div class="slds-form-stacked">
<b>Account:</b>
<div class="slds-form-element">
<dl class="slds-dl--inline">
<dt class="slds-dl--inline__label">Name:</dt>
<dd class="slds-dl--inline__detail">
<ui:outputText value="{!v.accRec.Name}" />
</dd>
<dt class="slds-dl--inline__label">Active:</dt>
<dd class="slds-dl--inline__detail">
<ui:outputCheckbox value="{!v.accRec.Active__c}" />
</dd>
<dt class="slds-dl--inline__label">Website</dt>
<dd class="slds-dl--inline__detail">
<ui:outputURL label="{!v.accRec.Website}" value="{!v.accRec.Website}" />
</dd>
</dl></div>
</div>
<div class="slds-form-stacked">
<b>Contact:</b>
<div class="slds-form-element">
<dl class="slds-dl--inline">
<dt class="slds-dl--inline__label">Last Name:</dt>
<dd class="slds-dl--inline__detail">
<ui:outputText value="{!v.conRec.LastName}" />
</dd>
<dt class="slds-dl--inline__label">Email:</dt>
<dd class="slds-dl--inline__detail">
<ui:outputEmail value="{!v.conRec.Email}" />
</dd>
<dt class="slds-dl--inline__label">Phone:</dt>
<dd class="slds-dl--inline__detail">
<ui:outputPhone value="{!v.conRec.Phone}" />
</dd>
</dl></div>
</div>
	<lightning:button variant="neutral" label="Back" onclick="{!c.backToContact}" />
			<lightning:button variant="brand" label="Submit" onclick="{!c.submit}" /></div>
</aura:component>
Step 7: AccountContactReviewScreenController.js
backToContact : function(component, event, helper) {
$A.createComponent(
"singhforce:CreateNewContact",
{
"accRec":component.get("v.accRec"),
"conRec":component.get("v.conRec")
},
function(newComp) {
var content = component.find("body");
content.set("v.body", newComp);
}
);
},
submit : function(component, event, helper) {
// submit logic
}
Few are the catch points here:
- The object records data are being passed from one component to another by attributes.
- $A.createComponent uses the component name prefixed with namespace.
- In the components, I have not used any picklist fields as it was earlier covered in the post.
Please feel free to post your queries/thoughts.
Happy coding!!!